My personal verdict: I like this method. It's easy to cut, requires minimal marking and the results are reasonable. But a word to the wise, I do not use this method if I'm tired or have enjoyed a glass of wine.
The measurements used to cut the pieces for this method are the same as for a traditionally pieced Flying Goose except you will NOT cut any of the pieces diagonally. You will work with just the squares as they are.
For an introduction to understanding the math for Flying Geese please read Making Geese Fly.
In a nutshell:

- A = desired height of finished unit + 7/8”
- B = desired width of finished unit + 1-1/4”
The measurements given in the example below will create FOUR identical Flying Geese units with a footprint (finished size) of 1-1/2” tall x 3” wide. When your unit is finished it will measure 2" x 3-1/2" because it includes a 1/4" seam allowance on all four sides. These measurements can be also be used for traditionally pieced Flying Geese.
Cut the following
Cut the following
- Four 2-3/8" squares
- One 4-1/4" square

- On the wrong side of each 2-3/8" square draw a diagonal line from corner to corner.
- Lay the large square face up. Place two small squares in opposite corners, right sides together with the larger square. The inner corner of the small squares will slightly overlap.
- Stitch a scant 1/4 inch on both sides of the drawn line.
- Cut apart on the drawn line.
- Press very carefully towards the larger triangle. Be certain to use the straight edge of the iron and don’t pull or stretch.
- Lay the remaining two squares right sides together with each unit from step 4.
- Stitch a scant 1/4 inch on both sides of the drawn line.
- Cut apart on the drawn line.
- Press each unit very carefully.
So, you may think you are done there .. but honestly I recommend a few more steps to check things out.
Um, yes - I was tired when I made these and maybe had had a glass of whine but in the end this just helps me to help you see where you might want to check things.
It is not unusual for the bottom of these geese to bow out. The hangy points may bother you too. If I were to take these four geese, just as they are and sew them together I could be fighting against myself a bit - I'd really like all my points to meet at the edges of my units so sometimes a trim is in order.
Here's where I check my geese for any imperfections.
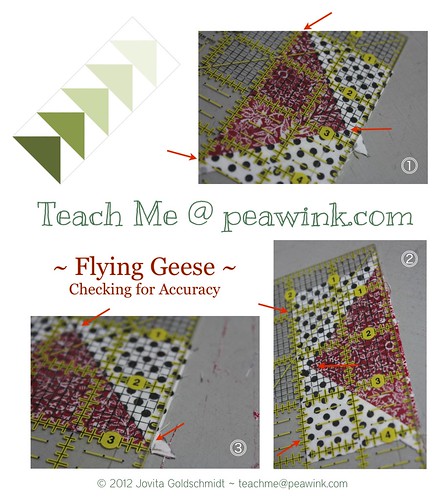
- First I check the top edge of my goose. Make sure that you have a 1/4" seam allowance above the tip (nose) of your goose. If you need to trim, make sure that the lower corners are level. In my case - they are on the 2" line of my ruler because I am aiming for a trimmed goose that measures 2" x 3-1/2".
- Now align the ruler along the straight edge at the top and check the height. This method more than any other often results in a slightly bowed goose butt. Check the distance between the lower points (sorry not marked in photo) - the distance should be your desired width. If it isn't something may have gone wrong with your seam allowances. If everything seems ok, go ahead and give your goose's bottom a trim.
- Next check the width. Calculate the center point of your goose (in this case it is 1-3/4" (3-1/2" divided by 2) and place this mark at the tip of your goose. Line up the ruler along the top and bottom edge of your goose - they should now be perfect. Carefully trim the side of your goose if necessary - remember, you want that diagonal seam to exit the goose exactly at the corner so check carefully before you trim.
Very nicely done! I found this on Pinterest. It is also the method that is in the recent issue of McCalls Quilting magazine. there is a video from Connecting Thread that I am off to watch too...after I check out your blog a bit more!
ReplyDelete