Wednesday, June 13, 2012
Tuesday, June 12, 2012
Flying Geese ~ Four-at-a-Time "No Waste" Method
This method is pretty straight-forward and involves no waste, but precise cutting and careful pressing are needed to ensure the best results. Very straight lines with exact seam allowances are a must. Try this method with some scraps first to see if it’s going to work for you.
My personal verdict: I like this method. It's easy to cut, requires minimal marking and the results are reasonable. But a word to the wise, I do not use this method if I'm tired or have enjoyed a glass of wine.
The measurements used to cut the pieces for this method are the same as for a traditionally pieced Flying Goose except you will NOT cut any of the pieces diagonally. You will work with just the squares as they are.
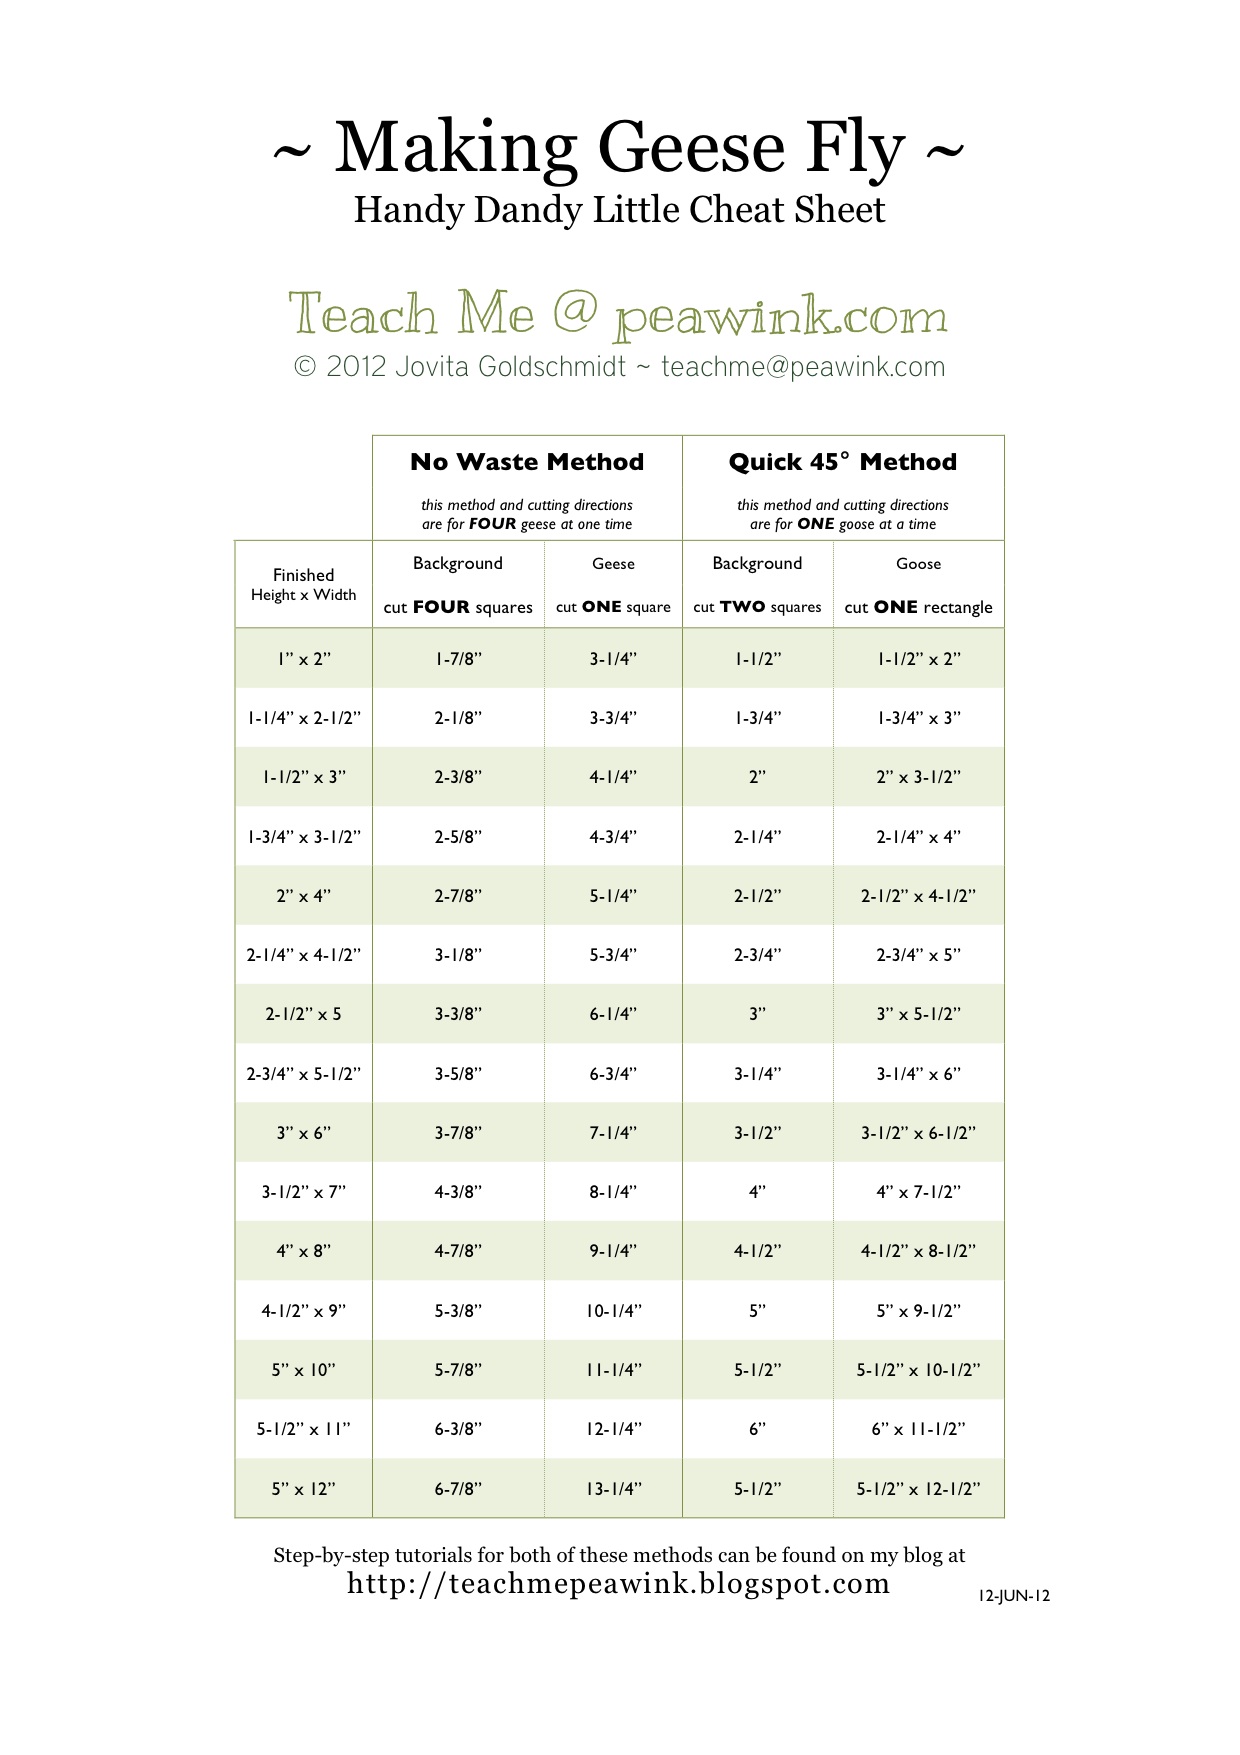
For an introduction to understanding the math for Flying Geese please read Making Geese Fly.
In a nutshell:


Voila!
Four identical Flying Geese.
So, you may think you are done there .. but honestly I recommend a few more steps to check things out.
Um, yes - I was tired when I made these and maybe had had a glass of whine but in the end this just helps me to help you see where you might want to check things.
It is not unusual for the bottom of these geese to bow out. The hangy points may bother you too. If I were to take these four geese, just as they are and sew them together I could be fighting against myself a bit - I'd really like all my points to meet at the edges of my units so sometimes a trim is in order.
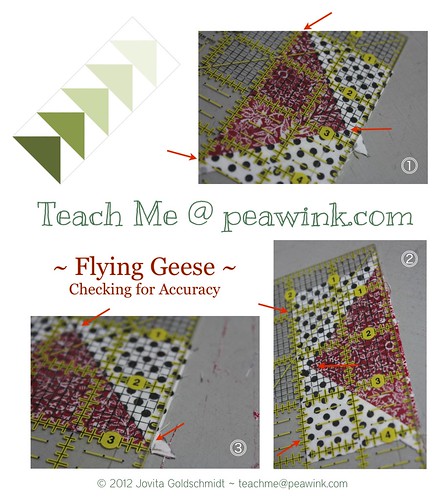
Here's where I check my geese for any imperfections.
My personal verdict: I like this method. It's easy to cut, requires minimal marking and the results are reasonable. But a word to the wise, I do not use this method if I'm tired or have enjoyed a glass of wine.
The measurements used to cut the pieces for this method are the same as for a traditionally pieced Flying Goose except you will NOT cut any of the pieces diagonally. You will work with just the squares as they are.
For an introduction to understanding the math for Flying Geese please read Making Geese Fly.
In a nutshell:
- A = desired height of finished unit + 7/8”
- B = desired width of finished unit + 1-1/4”
The measurements given in the example below will create FOUR identical Flying Geese units with a footprint (finished size) of 1-1/2” tall x 3” wide. When your unit is finished it will measure 2" x 3-1/2" because it includes a 1/4" seam allowance on all four sides. These measurements can be also be used for traditionally pieced Flying Geese.
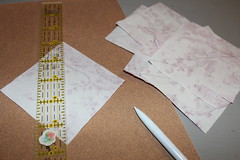
Cut the following
Cut the following
- Four 2-3/8" squares
- One 4-1/4" square
- On the wrong side of each 2-3/8" square draw a diagonal line from corner to corner.
- Lay the large square face up. Place two small squares in opposite corners, right sides together with the larger square. The inner corner of the small squares will slightly overlap.
- Stitch a scant 1/4 inch on both sides of the drawn line.
- Cut apart on the drawn line.
- Press very carefully towards the larger triangle. Be certain to use the straight edge of the iron and don’t pull or stretch.
- Lay the remaining two squares right sides together with each unit from step 4.
- Stitch a scant 1/4 inch on both sides of the drawn line.
- Cut apart on the drawn line.
- Press each unit very carefully.
So, you may think you are done there .. but honestly I recommend a few more steps to check things out.
Um, yes - I was tired when I made these and maybe had had a glass of whine but in the end this just helps me to help you see where you might want to check things.
It is not unusual for the bottom of these geese to bow out. The hangy points may bother you too. If I were to take these four geese, just as they are and sew them together I could be fighting against myself a bit - I'd really like all my points to meet at the edges of my units so sometimes a trim is in order.
Here's where I check my geese for any imperfections.
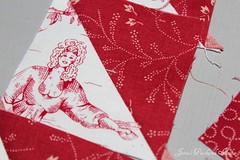
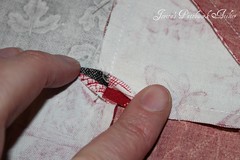
- First I check the top edge of my goose. Make sure that you have a 1/4" seam allowance above the tip (nose) of your goose. If you need to trim, make sure that the lower corners are level. In my case - they are on the 2" line of my ruler because I am aiming for a trimmed goose that measures 2" x 3-1/2".
- Now align the ruler along the straight edge at the top and check the height. This method more than any other often results in a slightly bowed goose butt. Check the distance between the lower points (sorry not marked in photo) - the distance should be your desired width. If it isn't something may have gone wrong with your seam allowances. If everything seems ok, go ahead and give your goose's bottom a trim.
- Next check the width. Calculate the center point of your goose (in this case it is 1-3/4" (3-1/2" divided by 2) and place this mark at the tip of your goose. Line up the ruler along the top and bottom edge of your goose - they should now be perfect. Carefully trim the side of your goose if necessary - remember, you want that diagonal seam to exit the goose exactly at the corner so check carefully before you trim.
Monday, June 11, 2012
Making Geese Fly
Flying Geese, they are wonderful things aren't they? Next to a 9-patch they are probably the most iconic shape in our quilting repertoire. And incredibly versatile.

Understanding the math involved in a traditional Flying Geese block is the first step.
It's important to remember that traditional Flying Geese always have a ratio of 1 to 2.
In other words, your goose is always twice as wide as it is tall.
So, if your finished goose unit is 3” tall, it would be 6” wide. If it is 4" tall, it should measure 8" wide and so on.
Once you know how big your
finished goose unit needs to be,
you're ready to fly.
These measurements can be used for traditional piecing as well as the "no waste" method for making Flying Geese.
(these links will be updated as the methods are introduced ... check back often, they're being cut, sewn, photographed and explained ~ as we speak ~ )
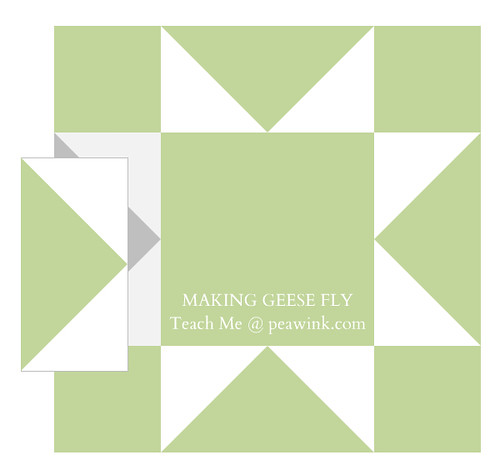
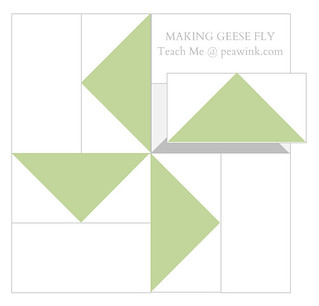
You can make a whole gaggle, construct a star or surprise - here's a pinwheel.
Understanding the math involved in a traditional Flying Geese block is the first step.
It's important to remember that traditional Flying Geese always have a ratio of 1 to 2.
In other words, your goose is always twice as wide as it is tall.
So, if your finished goose unit is 3” tall, it would be 6” wide. If it is 4" tall, it should measure 8" wide and so on.
Once you know how big your
finished goose unit needs to be,
you're ready to fly.
These measurements can be used for traditional piecing as well as the "no waste" method for making Flying Geese.
- A = desired height of finished unit + 7/8”
- B = desired width of finished unit + 1-1/4”
(these links will be updated as the methods are introduced ... check back often, they're being cut, sewn, photographed and explained ~ as we speak ~ )
- Traditional piecing ... each piece is cut and sewn individually by hand or by machine
- "No Waste" or "Four at a Time" method
- 45° or "wasteful" method - so called because you will have left-over half square triangles
Tuesday, May 29, 2012
Reverse Applique
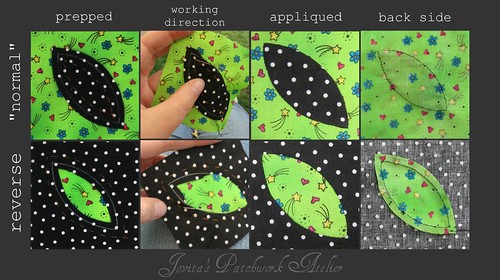
I've had a couple of questions about what "reverse" applique means? I thought I'd see if I could come up with a simple explanation for you all.
WHAT is reverse Applique?
The term reverse applique applies when the desired shape is cut out of the upper layer of fabric and appliqued along the inner edge of this "hole" to reveal the fabric below.
HOW IS IT DIFFERENT from "normal" Applique?
The easiest way for me to paraphrase this is ...
WHY do reverse Applique?
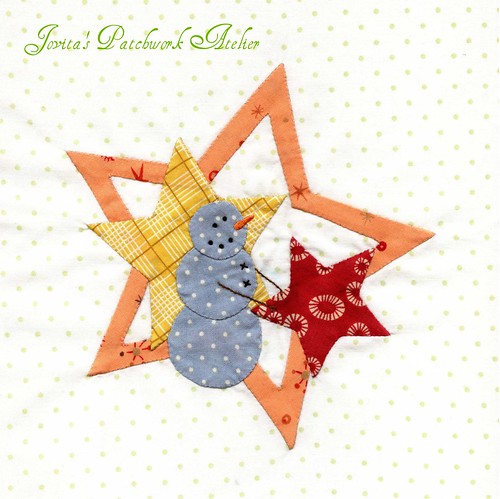
 One reason for doing reverse applique instead of "normal" is that the background fabric would show through ... for example if you were appliquing a white snowman or ghost onto a darker background. You would get what is called "shadowing" or "ghosting" around the inside edge of the applique shape. So you could applique the lighter object behind (in reverse) your background.
Before I decided that my black fabric should be on top, I checked if there would be a problem. See that black showing through in the top picture? Well that means that if I had appliqued a green melon shape on top of the black, you'd not only see a green ghost (in the seam allowance) but also the black showing through the middle. I could have avoided the black in the middle if I cut my background out from my applique but I *almost* never do that.
Of course there are other practical, dimensional and even fun reasons for doing reverse applique.
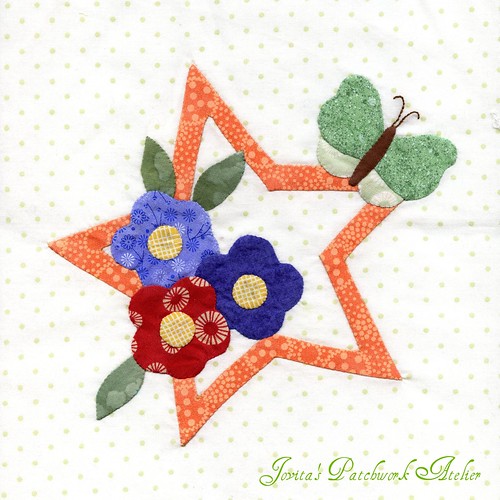
For example when you want to add detail without adding another layer on top. In both cases here the detail in the rose, leaves and star are created using reverse applique.


For my "boy" version of Bunnyhill Designs basket BOM, I am appliqueing a star first and then adding the elements of each month's theme on top. The outside edge of the star is of course "normal" applique, the inside is done using reverse applique.
So, I'm sure you have more questions, so feel free to ask away and I'll do my best to answer them whether it's more about applique or anything else you're curious about.
Happy stitching! Jovita
WHAT is reverse Applique?
The term reverse applique applies when the desired shape is cut out of the upper layer of fabric and appliqued along the inner edge of this "hole" to reveal the fabric below.
HOW IS IT DIFFERENT from "normal" Applique?
The easiest way for me to paraphrase this is ...
- "normal" applique is stitched
- counter-clockwise around the
- outside of the shape which sits
- on top of the background.
- reverse applique is stitched
- clock-wise around the
- inside of the shape which sits
- beneath the background.
If you are left-handed ... "normal" applique is stitched clock-wise and reverse applique is stitched counter-clockwise.Here's a quick photo-cap:
Down-load a printer friendly version of this picture tutorial here.
WHY do reverse Applique?
One reason for doing reverse applique instead of "normal" is that the background fabric would show through ... for example if you were appliquing a white snowman or ghost onto a darker background. You would get what is called "shadowing" or "ghosting" around the inside edge of the applique shape. So you could applique the lighter object behind (in reverse) your background.Before I decided that my black fabric should be on top, I checked if there would be a problem. See that black showing through in the top picture? Well that means that if I had appliqued a green melon shape on top of the black, you'd not only see a green ghost (in the seam allowance) but also the black showing through the middle. I could have avoided the black in the middle if I cut my background out from my applique but I *almost* never do that.
Of course there are other practical, dimensional and even fun reasons for doing reverse applique.
For example when you want to add detail without adding another layer on top. In both cases here the detail in the rose, leaves and star are created using reverse applique.
For my "boy" version of Bunnyhill Designs basket BOM, I am appliqueing a star first and then adding the elements of each month's theme on top. The outside edge of the star is of course "normal" applique, the inside is done using reverse applique.
So, I'm sure you have more questions, so feel free to ask away and I'll do my best to answer them whether it's more about applique or anything else you're curious about.
Happy stitching! Jovita
Morning Star
This is a picture heavy post .. lots of pictures showing you
how I pieced and pressed this block.
Instead of just showing you how to make simple Flying Geese, we'll construct the first block of our Morning Star, Morning Bright Block of the Month.
 You'll start with cutting all your pieces:
Background:
A FOUR 3-1/2" squares
B FOUR 3-1/2" x 6-1/2" rectangles
Star:
C EIGHT 3-1/2" squares
Center:
D ONE 6-1/2" square
On the wrong side of all C squares, draw a line diagonally from corner to corner. I use a regular sharp or mechanical pencil. One good tip is to lay the square on a piece of fine sand paper so things don't scootch around. To preserve the markings on your ruler, apply one layer of clear packing tape and then trim around the ruler. Replace as necessary.
 Now you're ready to make the flying geese units for the block - you'll need four using pieces B and C.
Referring to the handout provided with the block directions (click here) you'll place one C square even with three edges of a B rectangle and sew directly on the drawn line. Press and check before trimming - be sure to allow that 1/4" seam allowance.
Your seam allowance will be pressed toward the corner of the flying goose (see illustration on the left) and if you sew those "waste" triangles together you won't lose them because we can use them later. Repeat with the opposite corner ... and you'll have a flying goose plus two "wasteful" half-square triangle units.
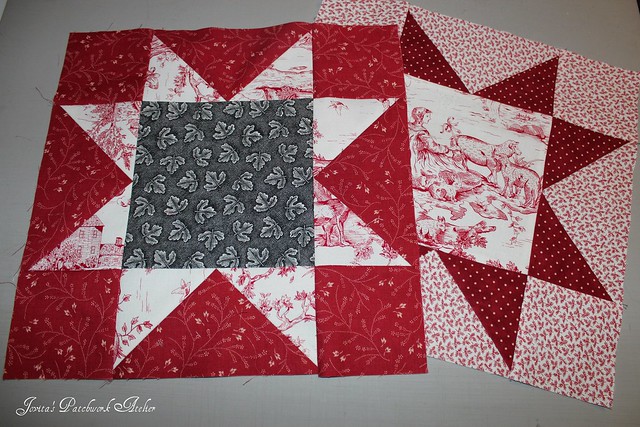
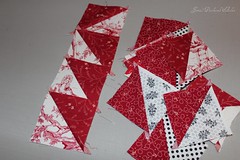 If you make a bunch of blocks you can end up with a pile of half-square triangle units. Some might accidentally be even just a tad funny.
Ok, I'm getting just a tad distracted here ...

 Once you have your flying geese units, you are ready to sew the block together in rows.
Press all seam allowances away from the geese.
Then you can sew those rows together into a complete block.
Wait!
Are you wondering
how I pressed those "they were too bulky" and now they're "funny looking" seams?
Here's a closeup.

I try to keep the "open" part of the seam as short as possible because I really AM . NOT . A . FAN of pressing seems open.
Then I flip the block over and press the rest of the seam from the right side. And yes, I always press from the right side so that I am sure my seams are completely pressed to the side.
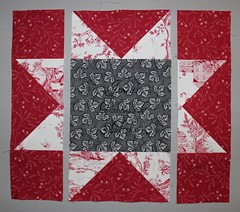
 So there you have it. A completed Morning Star block. Did I miss anything? Don't hesitate to tell me and I'll do my best to explain it further. In the meantime I'm off to get block two ready for you!
Happy sewing one and all and to all a wonderful flight! xox J
Subscribe to:
Posts (Atom)